Using the JDY-08 module
I'm noting here what I found about the cheap JDY-08 module that's available on various Chinese markets. It is a very small device, probably made as a cheaper version of the HM-11. By default, it has different firmware on it which doesn't work as well as the official firmware.
Connecting
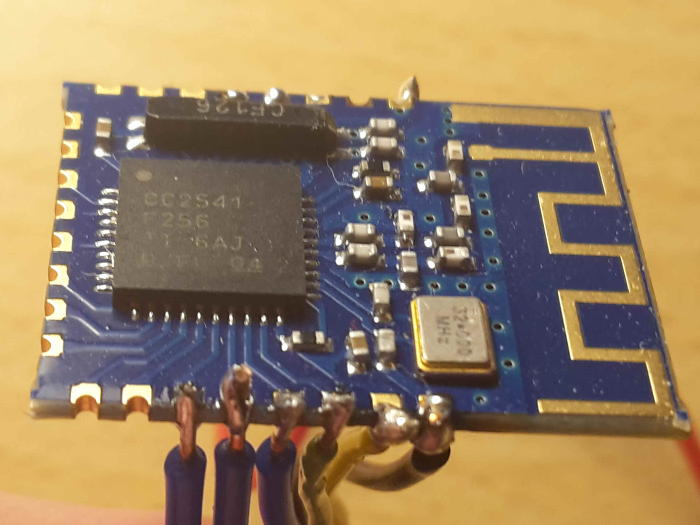
I soldered a few wires to the bare module. In particular you need to solder VCC, GND, P02 and P03. This is not exactly the best soldering I ever did, and I wouldn't recommend it as I broke one of the connections (P22, which is crucial for flashing a new firmware on it). There is a tutorial on how to solder it properly over here that I haven't fully watched but it seems good.
Note that the actual device is very small, just a bit bigger than a thumbnail.
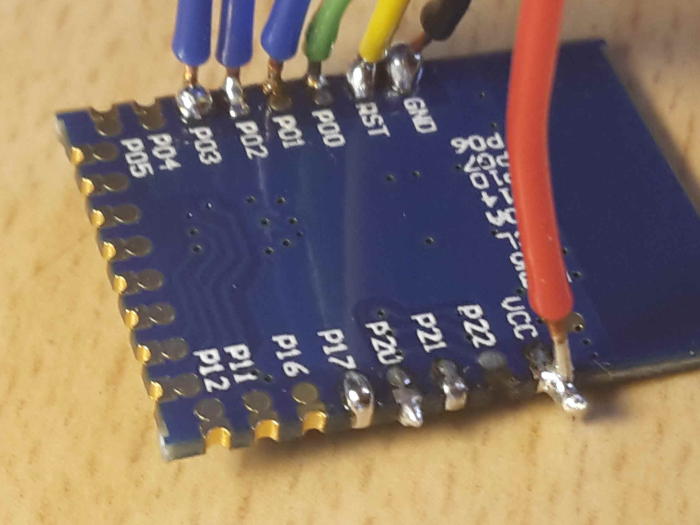
There are four wires you need to connect to communicate with an Arduino. Note: you will need level shifters between the 5V Arduino and the 3.3V JDY-08. I haven't tested it without them. It might work, but it might also blow up and the lifespan will certainly be shortened. You can also use a 3.3V Arduino, like this one.
| JDY-08 | Arduino UNO |
|---|---|
VCC |
3.3V |
GND |
GND |
P02 / RX |
TX (pin 11 in the code below), add a level shifter |
P03 / TX |
RX (pin 10 in the code below), add a level shifter |
To test that the device actually works, you only need VCC and GND. Just connect it and scan it using an app like nRF Toolbox for BLE. You should see the device show up as JDY-08.
So now you know the device works. The next step is communicating with it, and here it gets tricky. It took me a really long time to get to the right settings, but I got it working.
I tested using the following code, on an UNO. I have also tested it (using similar code as below) with a Pro Micro using the hardware UART on pin 0 and 1. Replace mySerial with Serial1 for that (note the 1).
Code
#include <SoftwareSerial.h>

SoftwareSerial mySerial(10, 11); // RX, TX

void setup() {
  // Open serial communications and wait for port to open:
  Serial.begin(9600);
  while (!Serial) {
    ; // wait for serial port to connect. Needed for native USB port only
  }

  // set the data rate for the SoftwareSerial port
  mySerial.begin(115200);

  Serial.println("begin");

}

void loop() {
  static uint32_t lastMillis = 0;
  if (millis() - lastMillis > 2000) {
    char* cmd = "AT+VER";
    Serial.println(cmd);
    mySerial.print(cmd);
    lastMillis += 2000;
  }

  if (mySerial.available()) {
    Serial.write(mySerial.read());
  }

  if (Serial.available()) {
    mySerial.write(Serial.read());
  }
}
Upload this code and open the serial monitor. It requests the firmware version from the device, when it lacks a normal test command. You can write commands directly in the serial monitor (in the text entry at the top of the window).
I am now able to communicate with it, set it's name, etc. I haven't really tried much with it for now, but I can request it's name, MAC address and version, and I can change the name. The firmware version I get is JDY-08-V3.381.
A few notes on the serial protocol:
- It runs by default at 115200, which seems relatively fast compared to other modules. If that doesn't work, try some other speeds (e.g. 9600).
- It does not seem to use any newlines. Don't write a newline after a command - it will result in an error (
ERR). Also don't expect to get newlines from it. I think the module considers the command finished when a certain time has passed without bytes coming its way. - The
ATcommand – to test the connection – doesn't work. Many commands don't work. A command likeAT+HELPis also unavailable. To test the connection useAT+VER, for example. OrAT+MAC. These commands work with the crippled firmware that it ships with by default. - All commands are case sensitive: always use uppercase for the commands (but the values can be lowercase, e.g. to set a lowercase broadcast name).
Final remarks
There don't seem to be any power saving features. It is always stuck on using 8.3mA of power, which is too much for running on a coin cell. I think the firmware doesn't use any of the power saving features the SoC provides. None of these options had any effect:
- Lowering the advertising interval to 1000ms (
AT+ADVIN6, unlike what the documentation says this is not 8000ms but 1000ms). - Lowering the connection interval to 500ms (
AT+NEIN2), whatever it means. - Check that PWM is disabled (
AT+PWMOPEN). - Lowering the baud rate to 9600 (
AT+BOUD4, note the misspelled command). - Lowering the transmission power to -23dB (
AT+POWR3).
The default firmware may still be useful for a device that is directly connected from a power source. Or maybe for something that only needs to run a short while. Or maybe the host mode has some use, I don't know. Flashing the HM-10 firmware on it probably makes it a lot more useful but I can't do that unfortunately due to the broken pin.
Right now I'm considering the nRF5x series by Nordic, starting with the nRF51822-04 module. Using the CC254x chips as serial slave device may work, but I want to try programming it myself as a SoC (just like the ESP8266). Many good points are mentioned over here, but these are my biggest issues:
- It is practically required to purchase the $4000 IAR workbench for any serious development, although there is SDCC and some have linked it with the TI BLE stack (untested, but I have cloned the library just in case).
- I don't think it is legal to distribute the source code preventing any open source work - at least the example projects probihit releasing the source code.
- The CC254x is based on an ancient processor architecture which isn't really supported by any modern tools (e.g. GCC), while the nRF5x is based on an ARM M processor (with support from many tools like GCC). I think the ARM M line is the way forward. It is much better supported, e.g. with mbed.
- The nRF5x line is much more power efficient.
- The nRF5x line continues to be developed, where I've yet to see any progress from TI (CC254x).
Update: I have managed to flash the HM-10 firmware on it, but it doesn't seem to work. See my next post for a HOWTO.
Resources
- Work-in-progress datasheet on Google Docs
- Your Cee, the store where I bought this thing
- YouTube video, an unsuccessful attempt at communicating with the device